Thursday, October 29, 2009

Free Transpose and Warp!

This week we focused on the Free Transform and Warp tools in Photoshop. We started off with an easy one: using Free Transform to straighten a key-stoned building. Ever since Photoshop's math has improved (around version 7) I feel that the swings and tilts of the view camera have gone the way of the dinosaur. Above is a rare view (now hidden by a building) of the Chrysler building. The 35mm camera caused key-stoning. Photoshop CS4 straightened it up quickly.
We spent the remainder of the class matching your images to a file of a book and mug that I supplied. We learned about warp and I gave lots of class help on the left hand page. Then you all tried the right hand page by yourselves. Wrapping your image around the mug was next and we finished the night by adding highlights and shadows to our added layers. I think it's pretty cool and I was impressed by how well you all did. Next week we'll play (I mean work) with Liquify, Extract and maybe Paths.

Sunday, October 25, 2009

Retouching Humans

Did I cover too much this week?
I know that we did cover plenty. In our effort to slightly improve Juan, Bart and Jessica we used the Healing Tool, Clone Tool, Masks, Selections, Gaussian Blur, Levels, Hue & Saturation and the brush. I guess that retouching faces is a good way to improve on many of Photoshop's tools. You should have the new retouching PDF file. I will be incorporating these assignment PDF's into the original book. This Wednesday you will need to bring your building and flower images. I'll bring everything else. Remember to always back your images up. See you Wednesday!

Wednesday, October 14, 2009

Photoshop 2


Alright you crazy kids!
You finally got your hands dirty (digitally speaking not darkroom wet).
I know what we covered today might not have all been new to you but I hope that you got at least a glimmer of something new.
Tonight we covered working
on an image with the tool bar tools and the very helpful non-destructive adjustment filters, layer styles and masks found under the layer pallet.
The only way to know Photoshop is to use Photoshop. I have used it almost every day since 1994. It would be good to carry a file around and make yourself a pest to play with it.
Call me if you have any questions.
I'll see you next week.

Thursday, October 8, 2009

Photoshop!

I know, I know! I was long winded and boring last night.
It's just that Photoshop CS4 is so ah - robust, that I just wanted to do a "quick" review of as much as I could. I had no idea that it would actually take that long. Beginning next week, we will be doing actual work together on images. That's when the real fun begins.
You should now have a collection of general images: nicely exposed faces, faces against a very light background, buildings inside and out, and this week, flowers.
We will begin to edit those images in Photoshop next Wednesday.
Last night we should have seen that Adobe did a great job laying out this version (CS4) and that everything makes simple sense. We saw the pop-out choices that exist for some of the tools on the tool bar, how menu bar choices named edit affect layers, those called image affect all layers and those called select affect (get ready), Selections! See? it's all so logical and sensible. Lastly we looked a my own panel choices and saw how to add and remove panels using the menu bar choice called window.
Like I said, this was a lot to cover (talk, talk, talk) but you need an overview so that when we begin to work next week, you will know where different tools are located. Please find time to sit at a computer and play with an image and Photoshop. See what the different tools do. Class next week will go much better for you if you do.

Thursday, October 1, 2009

The Adjustment Bar


Okay folks, this one is really cool and a worthy advancement for Lightroom's v2.
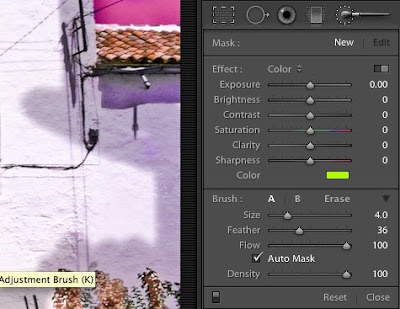
Two parts of the adjustment bar work together to make it awesome. On top is the brush tool itself, with which you can brush Exposure, Brightness, Contrast, Saturation, Clarity, Sharpness and Color. That's right, each of these can be brushed onto your image. You click on a part of your file and that button which appears is where the image information will come from for your edits. That's very cool but that's not all! Below these controls you see the brush control (size, feather & flow) and the all important mask feature.
The trouble for some of us with Lightroom was that by editing metadata, all we were able to make was global changes which affected the entire image. That's pretty limiting. The new mask feature however allows us to select an area and limit your edits to similar areas. We practiced using the mask and then painting on only selected areas of our image. The mask feature allows us to work in a similar way to the selection tools in Photoshop. As you work on an area, you can press the letter "O" to see the actual mask. Sometimes that makes the painting easier. I usually set the mask density to 100% so I can really see what I am doing. After your area is fully "selected", you can adjust any or all of the sliders and use that masked selection to perfect your image.
Next we looked at the gradient tool from the adjustment bar. The gradient tool is cool as well because, like the brush, you can gradate all of those same choices. In addition, you can add multiple gradations to you image overlapping things like exposure and saturation or color. This too is a leap in creative abilities in Lightroom.
We skipped over the red eye button. I think it works well, but I never use it. I think it is good for wedding photographers though.
The spot removal tool works differently from Photoshop in that you pick the spot that you wish to remove and then allow Lightroom (or you) to pick the place to copy to cover the spot. Lightroom does a pretty good job of picking and removing camera dirt can be a pretty quick job.
Lastly was the crop tool. This tool works very well, especially in conjunction with the post-crop vignette tool. With the crop tool you can straighten tilted images. Lightroom will crop the image to maintain the proper proportions. It fun to watch.
Okay. That was this week and with it we will be leaving Lightroom for a little while. Next week: Photoshop. The best image editing program to date.

Friday, September 25, 2009

The Lightroom Develop Module


This week, we explored the Lightroom Develop module pretty much as it existed in version 1. This module is divided into 7 sections.
-The first one is Basic.
The basic section is divided into
1) Image color correction including a white balance dropper and color temperature and tint sliders.
2) Image tonal correction including sliders for Exposure (just like a camera's f/stops), Recovery (remember, your raw file contains amazing additional information in the highlights), Fill Light (remember, your raw file contains amazing additional information in the shadow areas), Blacks (to increase blacks in the shadow area) and Brightness and Contrast (much like Photoshop).
3) Finally there are three Presence sliders. Clarity boosts mid-tone contrast in your image. Vibrance is a smart saturation slider that considers your image and limits it's effect to appropriate areas. Saturation boosts or cuts all colors at once.
-Next comes the Tone Curve. This section has your images' tone curve as well as clipping guides that appear as you begin to move the curve. Below the curve box you will see 4 sliders. This is another way to adjust the curve.
-Next down the list is the HSL /Color / Grayscale window. HSL helps you to adjust selected color ranges of your images. Color presents color range correction in a different way. The Grayscale window turns the appearance of you image to black and white, and allows you to see how editing the colors in the original file affect the grayscale image.
-Split Toning allows you to remove color casts that sometimes appear in the extremes of your image. Blue shadow areas and yellow highlights are common in out door photography and can be corrected in this window.
-Detail is the window in which you can sharpen, reduce noise and correct chromatic aberration in your images. There is a small window in which you can keep track of your sharpening. Noise reduction can be applied by either luminance, color or both. Chromatic aberration occurs sometimes when a lens isn't quite matched to a camera's chip (or film plane). The image has color fringing as a result and these sliders do a good job of cleaning that up.
-Vignettes has sliders to compensate for a lens that might have fall off near the edges and a nice post crop white or black vignette that will keep the vignette settings even after an image is cropped.
-Finally there is the Camera Calibration window. This window offers a drop down menu with camera specific profiles that can be applied to all of your images upon import as well as sliders to correct your cameras capture by color. This window is used to perfect the images captured by you camera.
Let's see, I spoke about the histogram and the two boxes that you can check to show clipping of the highlight or shadow areas, and on the left side how the history window will review your changes in the navigator as you roll your mouse over the history list.
What else, what else...
If you want some fun, open the presets window on the left side and run your mouse over the choices, you can see the changes occur in the navigator window just like with history.
We covered viewing your original image side by side your edited image for comparison and
finally, the ability to copy all you changes and then paste them all into another image.
The assignment for this week is to once again shoot people, this time against a light background. Keep the people nicely exposed but shoot them against a light background.
See you next week when we will play with the adjustment brush and it's friends, new to version 2.

Wednesday, September 16, 2009

Lightroom


Okay,
I did a "quick" repeat of last weeks class that seemed to take a little too long. Sorry about that.
I discussed how Lightroom edits metadata and Photoshop edits pixels.
Now onto Lightroom and the Library module which is covered in chapter 5 of the book. The physical book can be found at: http://www.lulu.com/ or in the pdf file given away for free.
Okay here we go:
#1) Lightroom edits metadata so your file remains unchanged. The metadata is married to your file upon export.
#2) We covered the Import Button and associated window which allows one to decide to copy files or leave them alone, add keywords, copyright and also choose which files to import and which to leave alone.
#3) We covered the Export Button and the associated Export window which lets you choose where, what kind, what name, image size, sharpening (less is more here), metadata and finally post processing (like Photoshop).
#4) We discussed some of the many ways to select images as favorites including stars, colors, collections and quick collections.
#5) We covered quick develop but I don't really like it.
#6) There was the additional keywording that we can add in the Library module after import and finally
#7) Metadata such as EXIF, IPTC and copyright.

I guess that's it. I know Photoshop is the big cool program, but Lightroom is very valuable. You have to let me know if you're learning anything. See you next Wednesday.