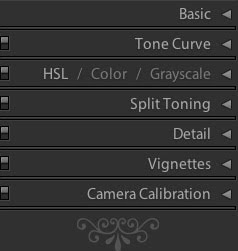
This week, we explored the Lightroom Develop module pretty much as it existed in version 1. This module is divided into 7 sections.
-The first one is Basic.
The basic section is divided into
1) Image color correction including a white balance dropper and color temperature and tint sliders.
2) Image tonal correction including sliders for Exposure (just like a camera's f/stops), Recovery (remember, your raw file contains amazing additional information in the highlights), Fill Light (remember, your raw file contains amazing additional information in the shadow areas), Blacks (to increase blacks in the shadow area) and Brightness and Contrast (much like Photoshop).
3) Finally there are three Presence sliders. Clarity boosts mid-tone contrast in your image. Vibrance is a smart saturation slider that considers your image and limits it's effect to appropriate areas. Saturation boosts or cuts all colors at once.
-Next comes the Tone Curve. This section has your images' tone curve as well as clipping guides that appear as you begin to move the curve. Below the curve box you will see 4 sliders. This is another way to adjust the curve.
-Next down the list is the HSL /Color / Grayscale window. HSL helps you to adjust selected color ranges of your images. Color presents color range correction in a different way. The Grayscale window turns the appearance of you image to black and white, and allows you to see how editing the colors in the original file affect the grayscale image.
-Split Toning allows you to remove color casts that sometimes appear in the extremes of your image. Blue shadow areas and yellow highlights are common in out door photography and can be corrected in this window.
-Detail is the window in which you can sharpen, reduce noise and correct chromatic aberration in your images. There is a small window in which you can keep track of your sharpening. Noise reduction can be applied by either luminance, color or both. Chromatic aberration occurs sometimes when a lens isn't quite matched to a camera's chip (or film plane). The image has color fringing as a result and these sliders do a good job of cleaning that up.
-Vignettes has sliders to compensate for a lens that might have fall off near the edges and a nice post crop white or black vignette that will keep the vignette settings even after an image is cropped.
-Finally there is the Camera Calibration window. This window offers a drop down menu with camera specific profiles that can be applied to all of your images upon import as well as sliders to correct your cameras capture by color. This window is used to perfect the images captured by you camera.
Let's see, I spoke about the histogram and the two boxes that you can check to show clipping of the highlight or shadow areas, and on the left side how the history window will review your changes in the navigator as you roll your mouse over the history list.
What else, what else...
If you want some fun, open the presets window on the left side and run your mouse over the choices, you can see the changes occur in the navigator window just like with history.
We covered viewing your original image side by side your edited image for comparison and
finally, the ability to copy all you changes and then paste them all into another image.
The assignment for this week is to once again shoot people, this time against a light background. Keep the people nicely exposed but shoot them against a light background.
See you next week when we will play with the adjustment brush and it's friends, new to version 2.

