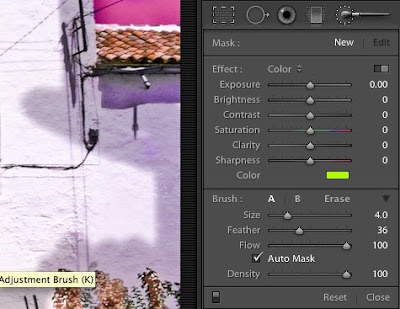
 Okay folks, this one is really cool and a worthy advancement for Lightroom's v2.
Two parts of the adjustment bar work together to make it awesome. On top is the brush tool itself, with which you can brush Exposure, Brightness, Contrast, Saturation, Clarity, Sharpness and Color. That's right, each of these can be brushed onto your image. You click on a part of your file and that button which appears is where the image information will come from for your edits. That's very cool but that's not all! Below these controls you see the brush control (size, feather & flow) and the all important mask feature.
The trouble for some of us with Lightroom was that by editing metadata, all we were able to make was global changes which affected the entire image. That's pretty limiting. The new mask feature however allows us to select an area and limit your edits to similar areas. We practiced using the mask and then painting on only selected areas of our image. The mask feature allows us to work in a similar way to the selection tools in Photoshop. As you work on an area, you can press the letter "O" to see the actual mask. Sometimes that makes the painting easier. I usually set the mask density to 100% so I can really see what I am doing. After your area is fully "selected", you can adjust any or all of the sliders and use that masked selection to perfect your image.
Next we looked at the gradient tool from the adjustment bar. The gradient tool is cool as well because, like the brush, you can gradate all of those same choices. In addition, you can add multiple gradations to you image overlapping things like exposure and saturation or color. This too is a leap in creative abilities in Lightroom.
We skipped over the red eye button. I think it works well, but I never use it. I think it is good for wedding photographers though.
The spot removal tool works differently from Photoshop in that you pick the spot that you wish to remove and then allow Lightroom (or you) to pick the place to copy to cover the spot. Lightroom does a pretty good job of picking and removing camera dirt can be a pretty quick job.
Lastly was the crop tool. This tool works very well, especially in conjunction with the post-crop vignette tool. With the crop tool you can straighten tilted images. Lightroom will crop the image to maintain the proper proportions. It fun to watch.
Okay. That was this week and with it we will be leaving Lightroom for a little while. Next week: Photoshop. The best image editing program to date.
 This week we focused on the Free Transform and Warp tools in Photoshop. We started off with an easy one: using Free Transform to straighten a key-stoned building. Ever since Photoshop's math has improved (around version 7) I feel that the swings and tilts of the view camera have gone the way of the dinosaur. Above is a rare view (now hidden by a building) of the Chrysler building. The 35mm camera caused key-stoning. Photoshop CS4 straightened it up quickly.
 We spent the remainder of the class matching your images to a file of a book and mug that I supplied. We learned about warp and I gave lots of class help on the left hand page. Then you all tried the right hand page by yourselves. Wrapping your image around the mug was next and we finished the night by adding highlights and shadows to our added layers. I think it's pretty cool and I was impressed by how well you all did. Next week we'll play (I mean work) with Liquify, Extract and maybe Paths.


